

In Atlassian Confluence, native tools exist to help you write and manage requirements, such as the product requirements template (PRD). But there are also many apps that can help you achieve this mission, and simplify it. Lost is the time when you were searching through a thousand pages document to find the requirement from paragraph 8.4.3243.2438028!
Requirements belong in Confluence, because it is the long-term place to store specifications, as the foundation of your project. Have you been asking yourself: what was the original requirement again? Then writing requirements in Confluence is the way to make them last.
You may be tempted to write all your requirements individually, as Jira issues, but you’ll notice extracting them into a document is very complicated. The correct tool would allow you to manage links to requirements on Jira issues, allowing you to have a specifications on one side, and the ever-changing tasks of the development, on the other side.
Now, there are a few tools available on the Atlassian Marketplace, we are going to tell you about Requirement Yogi, a plug-in for both Confluence and Jira. It will help you navigate through requirements, and build large reports to track the progress of your project. The app is aimed for business analysts, developers, testers and more generally engineering teams who need requirement traceability.
Requirement Yogi for Confluence
First things first, this is what a specifications document will look like with Requirement Yogi.
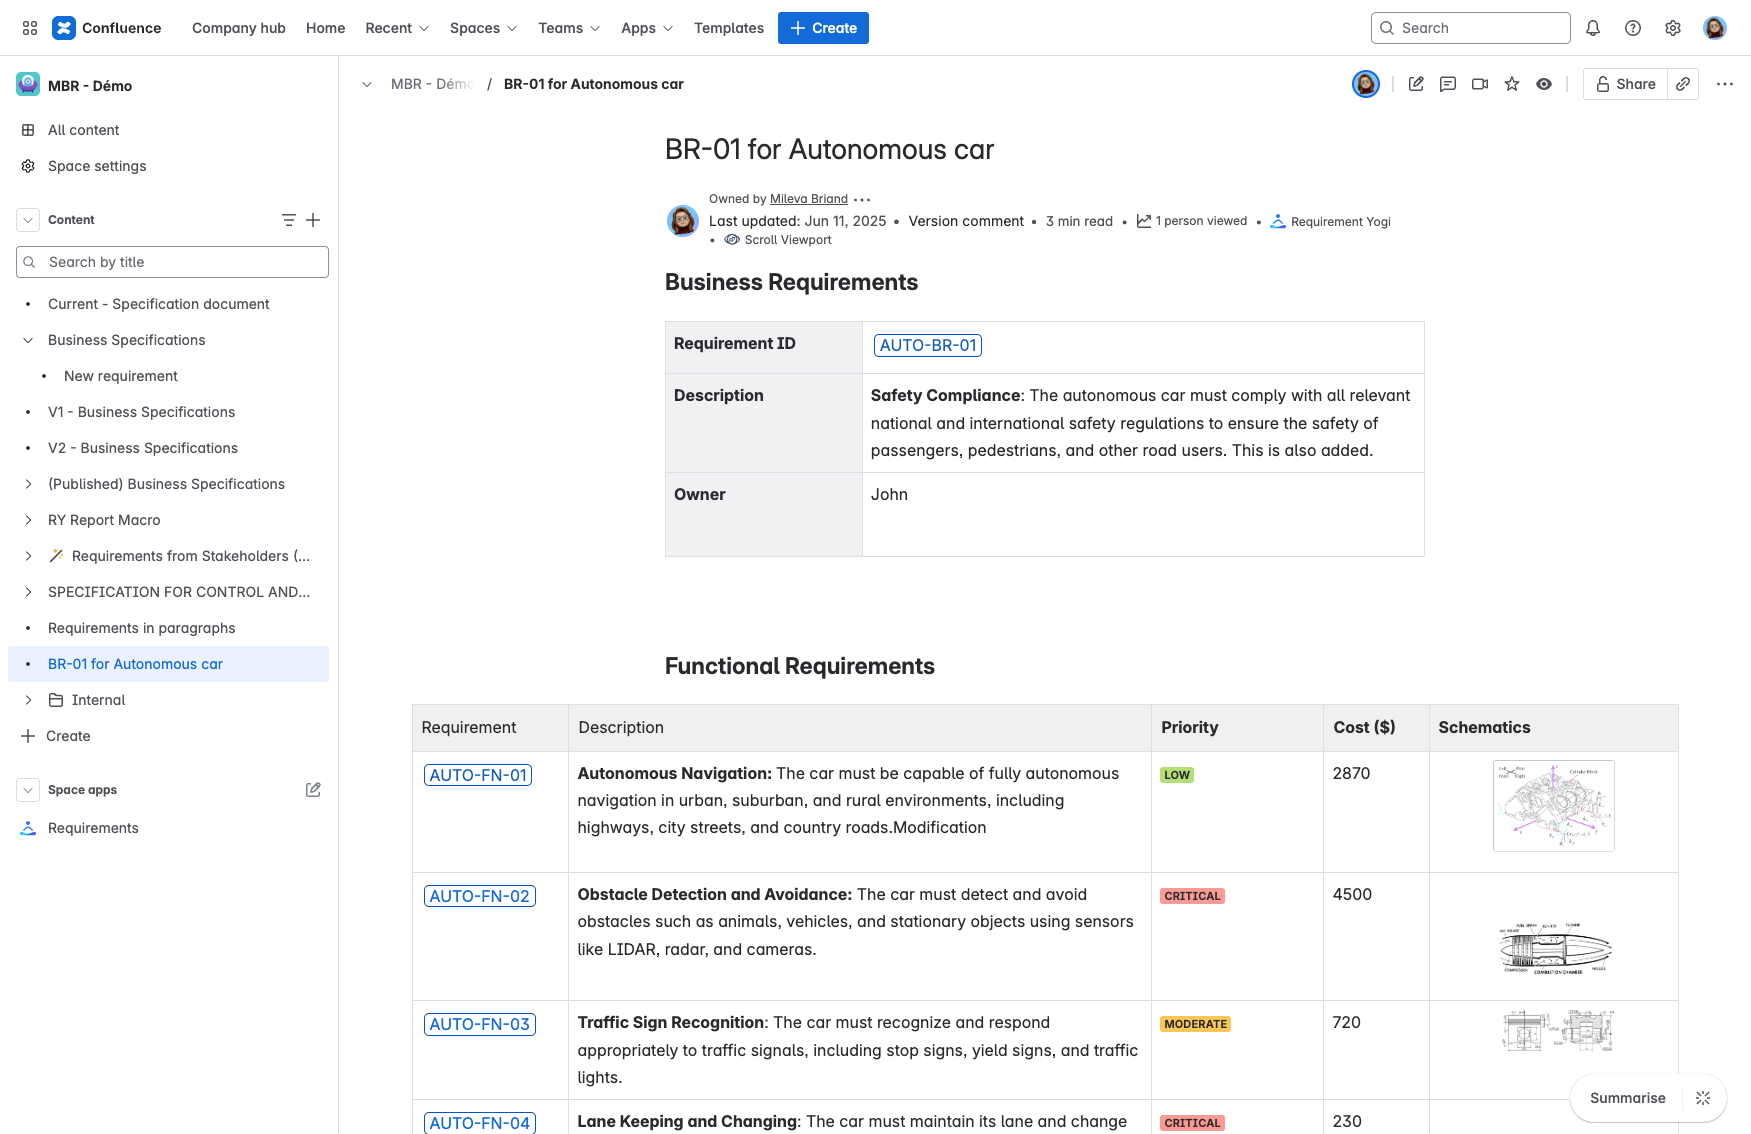
And here are the 3 main things to remember:
- Insert the macro using /req,
- Navigate between requirements, dependencies, and Jira issue links with the requirement detail,
- Search and Track requirements with the sidebar link.
The Requirement Yogi macro
The macro will behave as an anchor, allowing you to reference a requirement in any document, notes, and JIRA defects. The requirement pop-up will allow you to see an excerpt and navigate quickly across references.
In edit mode, there are a couple ways to insert a macro in Confluence, but the most practical one is the Keyboard with /req:
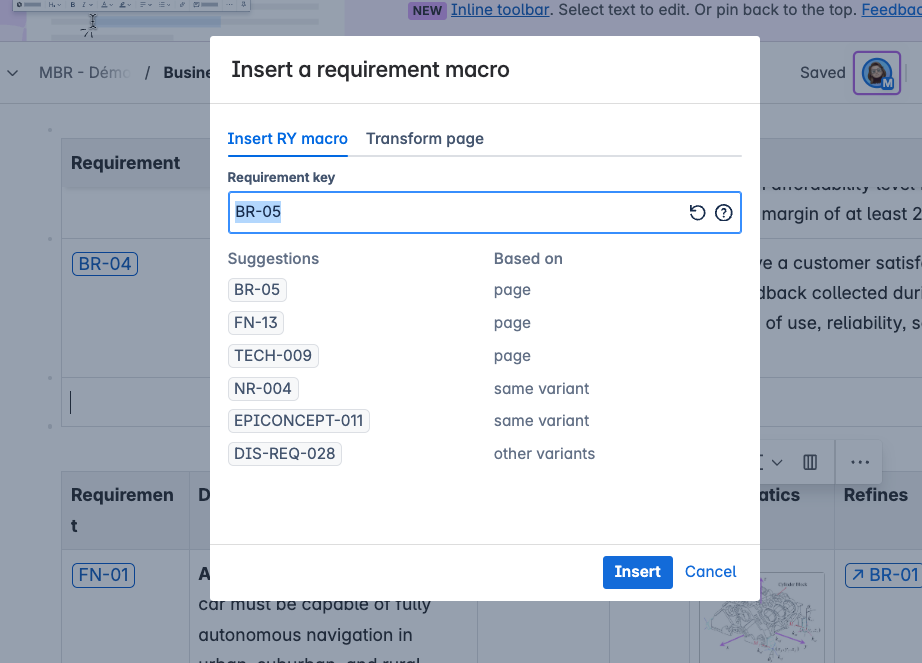
If you want to generate multiple keys from nothing, you can use the Transformation wizard. It will automatically create all the following requirements of the key and number you choose.
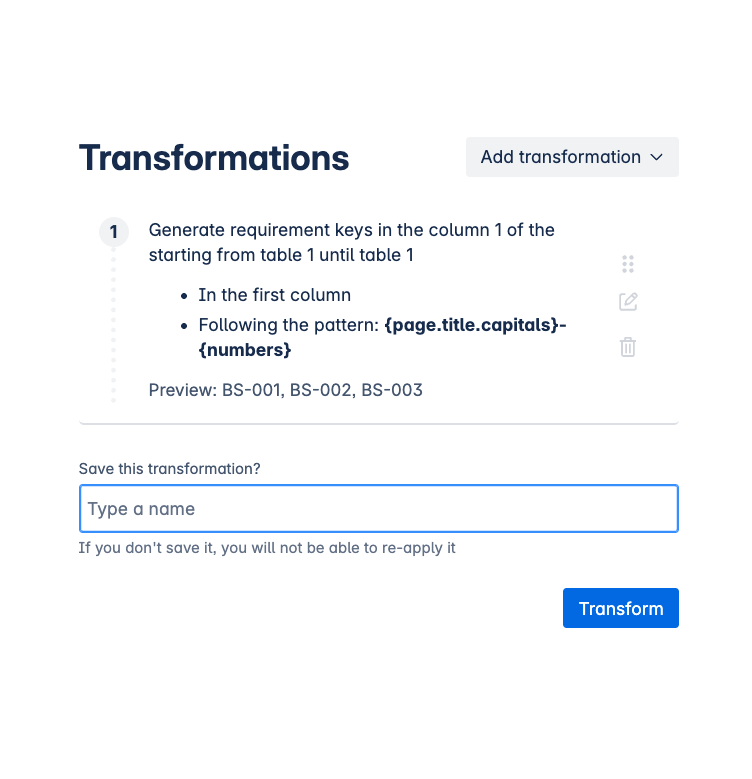
You can also edit existing keys with this powerful Transformation Wizard:
- Use the transformation rule “Transform text into keys” to transform your imported documents with existing keys, and “Transform text into links” to transform dependencies to existing requirements.
- And even better, if you want to replace even more key patterns, and you are familiar with regex, you can edit the pattern and tell the software exactly which terms should be replaced on the page. This is however reserved for advanced users.
The properties, dependencies, and search syntax
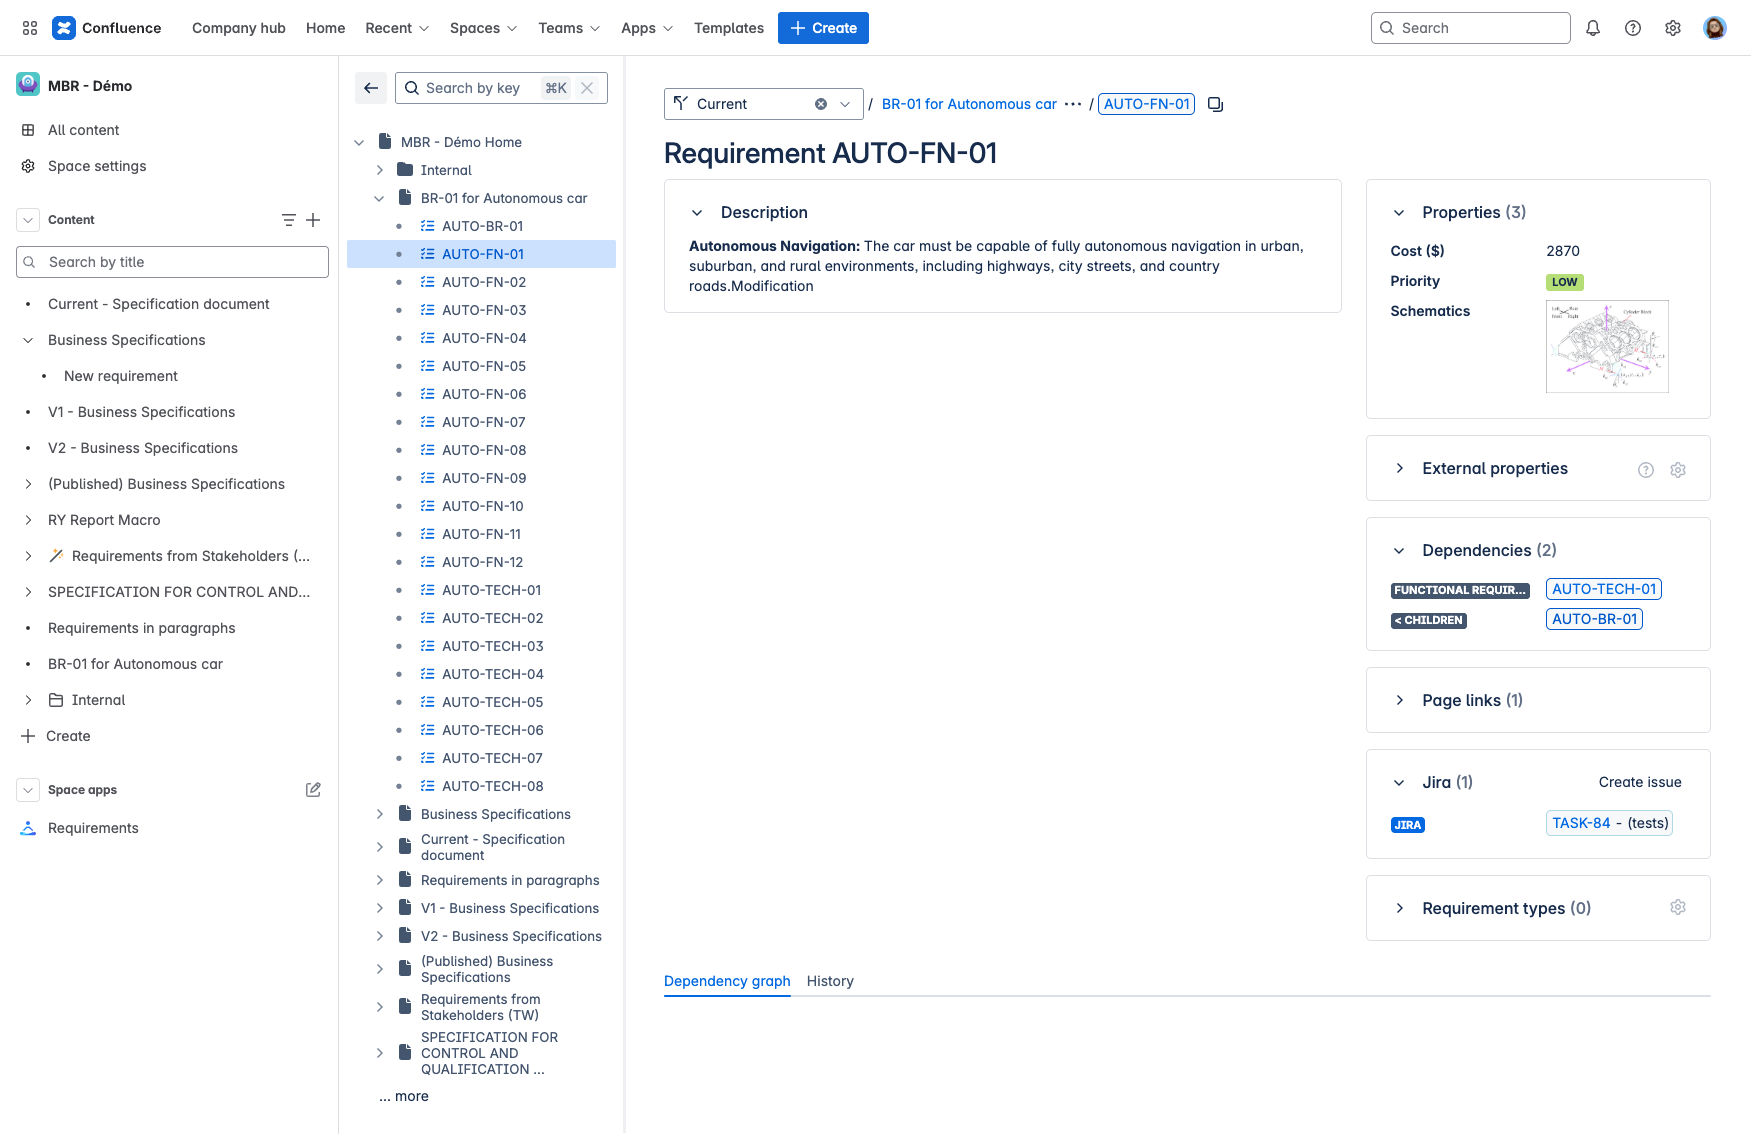
As said before, the requirement pop-up allows you to see all the properties of the requirement and its related links. So we will now discuss how properties and dependencies will allow you to track complex data using very simple concepts.
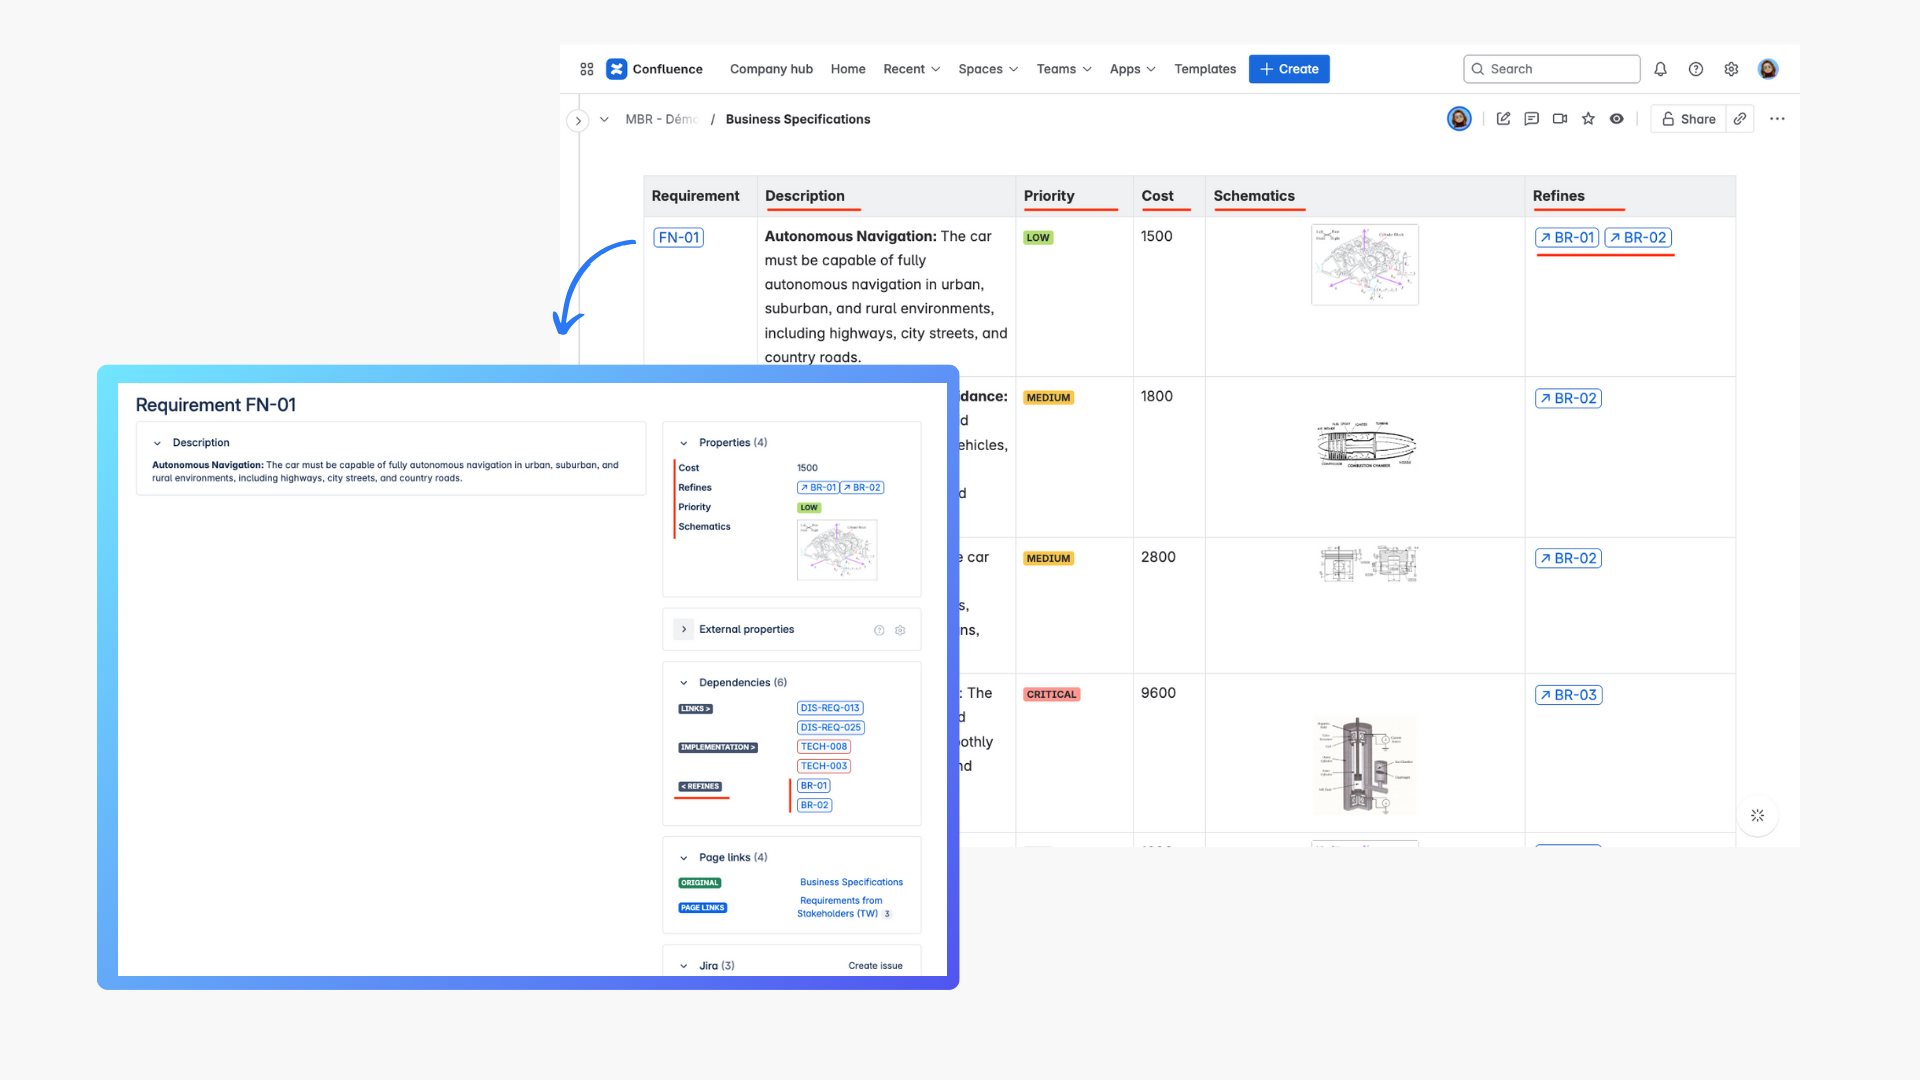
As you can see in the previous screenshots, the columns of your table become the requirement properties. All the properties with an asterisk are called external properties. They can be edited without disturbing the author of the requirement. The most common use is to put estimates on a requirement. When you want to look for all requirements with a specific property and you don’t know what the search syntax is: just click on it and it will automatically send you to the search tab. This is what we mean when we say the pop-up helps you to navigate across references.
Now, you’re probably asking yourself, how do I link a requirement to another requirement? Well, you can just use the keyboard shortcut in the same line as an existing requirement. First, it will suggest you create a new requirement key, but if you type an already existing key, you will have made a link to a requirement. We call it a dependency, you can refine requirements, creating parent and children requirements. In the same way as you would click on a property, you can click on a requirement link to see it. You can see in the picture below that you can also choose to show additional content of the dependency.
Okay, now that you’re an expert with properties and dependencies, it’s time to dive into the search.
Search tab and Search Syntax
The search helps you find specific requirements. The search syntax helps you narrow your search to find requirements with a specific property, requirements linked to Jira issues, and so on.
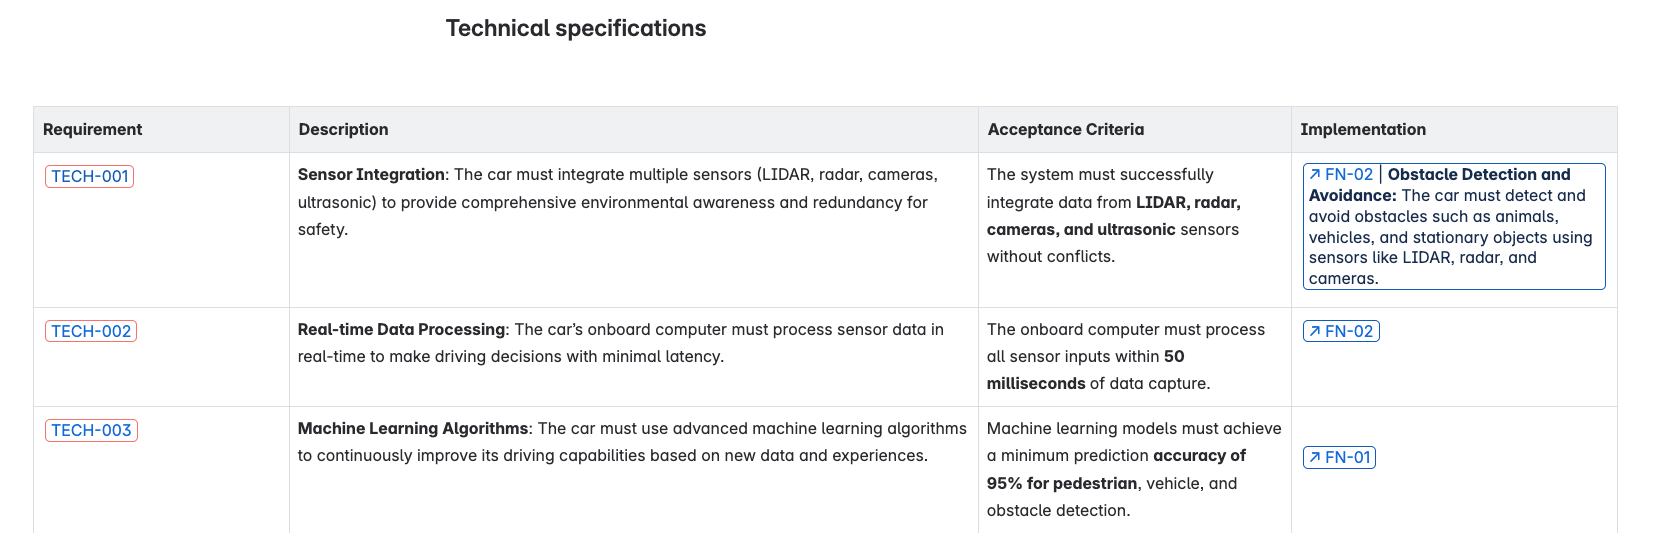
The syntax follows a rather standard syntax such as your criteria = your value. We’ll show you some examples based on the requirements shown previously:
- If you’re looking for requirements with an exact key, search for: key = ‘REQ-001’.
- Imagine you want to expand your results to search for similar values. You’ll want to use a soft equality and replace the equal sign with the tilde symbol. For example, if you want to look for all the keys with the same prefix, you will search for: key ~ ‘REQ-%’, use the percent symbol as a wildcard in your value.
- If your requirement has a specific value as a property, look for it with: @Owner = ‘Albert’. The “@” will always help you specify the name of the relationship. If your property name has a blank space or special character, you can escape it by putting a backward slash before it. But, as I explained before, if the name of your property is too complicated, just go into the pop up of one requirement and click on the property. It will automatically send you to the search, with the correct search syntax.
- To go further, imagine you are looking for all requirements that have no jira issues. Simply enter: Jira is null, to see the requirements that don’t have any jira links. If you are looking for all requirements with no Jira issue of a certain relationship, here the relationship tests, search for: jira@tests is null.
- Imagine you want to check the coverage of your requirements, and if they all have dependencies. Enter: TO is null, to find requirements with no parents. And: FROM is null, to find requirements those with no children. If you want to find all the requirements that are a parent of a specific requirement, search for: TO = ‘REQ-001’.
To find more information about the list of criterias, see our documentation. You can use the search syntax for all the tabs of Requirement Yogi. That leads us to one of the most important screens of the app: the Traceability Matrix.
Requirement Traceability Matrix (RTM)
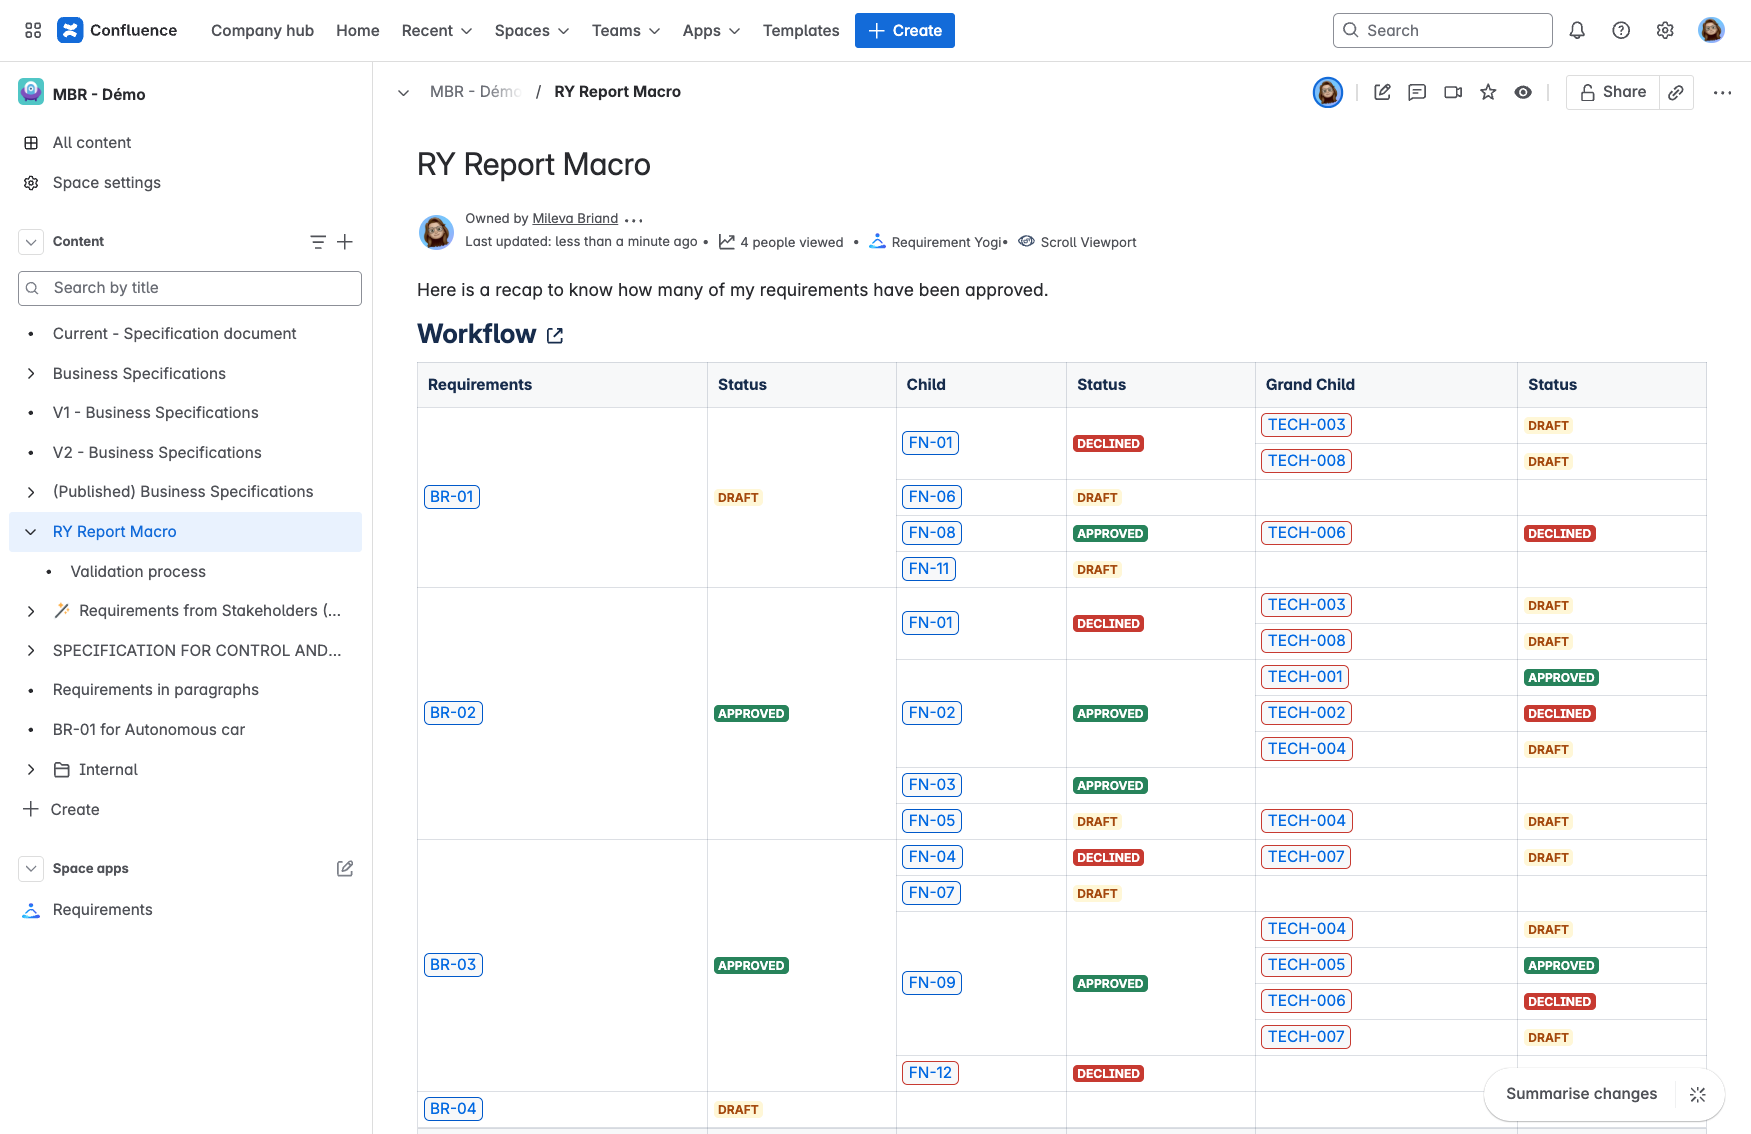
When you manage a project, you want an overview of the status of your project, see if your requirements have been approved, check the test results, and have a board that looks like this, with the data from your requirements. You can do that with the traceability matrix, which you can customize based on your needs.
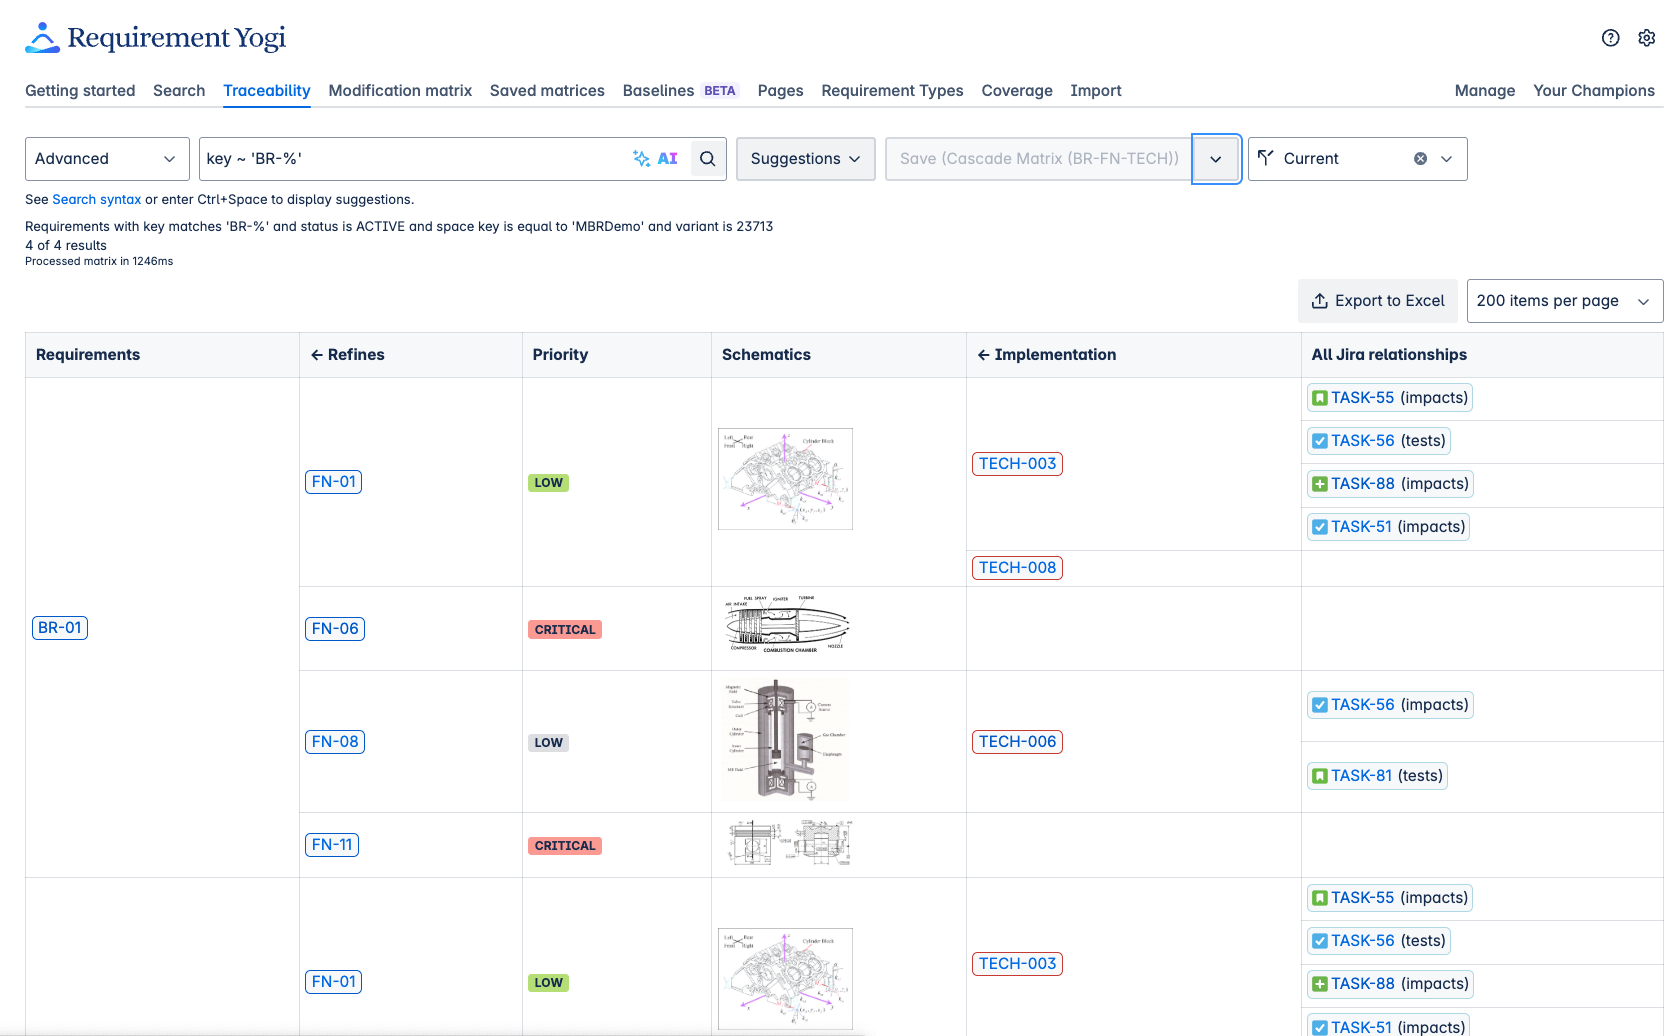
Let’s start from scratch. To add columns, click in the cog menu, here I am adding some properties and dependencies. We can see that BR 01 is refined by three FN requirements, and those are also refined by TECH requirements. You can see that the property I first added has moved all the way to the left, you can move it back to the right place simply by dragging and dropping it.
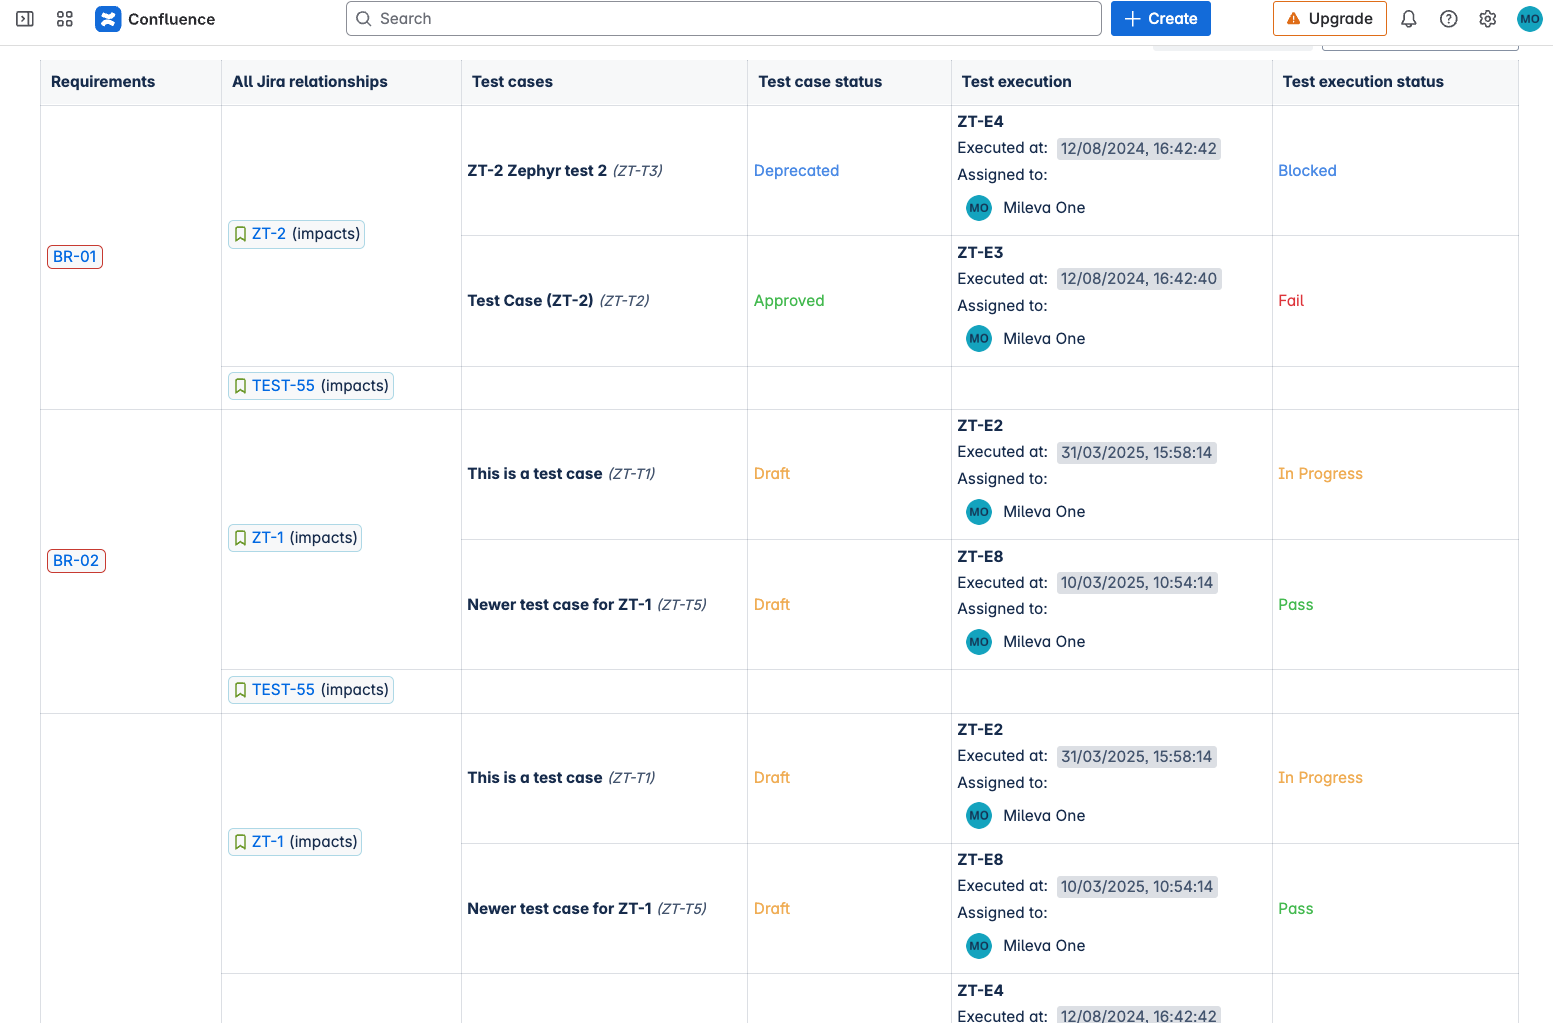
Using the same menu, you can add as many levels of dependencies as required. Requirement Yogi doesn’t mandate any specific structure or depth. You can even display Jira issues and their fields. In this example, we have an integration with the testing plug-in: Xray for Jira, in the custom fields, you can display the test plans status bar, giving you a quick insight into the status of your project.

If you want to see issue-to-issue links and all Jira fields, make sure you tick the: “get data from Jira” box. Here you can see the standard fields available for display, but also most of the custom fields. In this example, we have an integration with the app: Xray Test Management for Jira. In the custom fields, you can display the test plans status bar, giving you a quick insight into the project’s status. Read more about it here: How to test requirements with Xray, Zephyr, and the RY Testing and Compliance.
Reporting needs
If this matrix represents the status of your project, you will need to share it with colleagues and stakeholders. You can export the matrix to excel, or save it in Confuence by clicking on “Save”. You can manage permissions of a matrix to share it with other people on your space.
If you need to add explanations to your users about certain matrices, you can put this report on a page by copying the URL of the saved matrix to your page. It will create the Requirement Yogi report macro. Here, I am adding the status of the requirements that have the “UI Components” into a specific page. You can see what the macro looks like in editing mode, and in viewing mode:
If you want to export a very large matrix with a lot of requirements and issue links, it will take a lot of time to download the entire database from Jira. To display the data correctly and prevent it from lagging, click ‘Use Jira cache’, and untick it when you want to refresh the data. As of Excel exports, it will never be possible for you to download the entire Jira database into Confluence. Moreover, we do not include formatted text and images into Excel exports.
And that is pretty much all there is to know about the Traceability Matrix. You can always visit our documentation to learn more about the matrix and how to administrate it.
Well, I guess we’ve only been talking about how to use Requirement Yogi on Confluence. Let’s get to the Jira part!
Requirement Yogi for Jira
If you’ve read the beginning of the article carefully, you would know we don’t recommend writing requirements in Jira, but simply link them from Confluence to Jira issues. This is what the Requirement Yogi for Jira plug-in does.
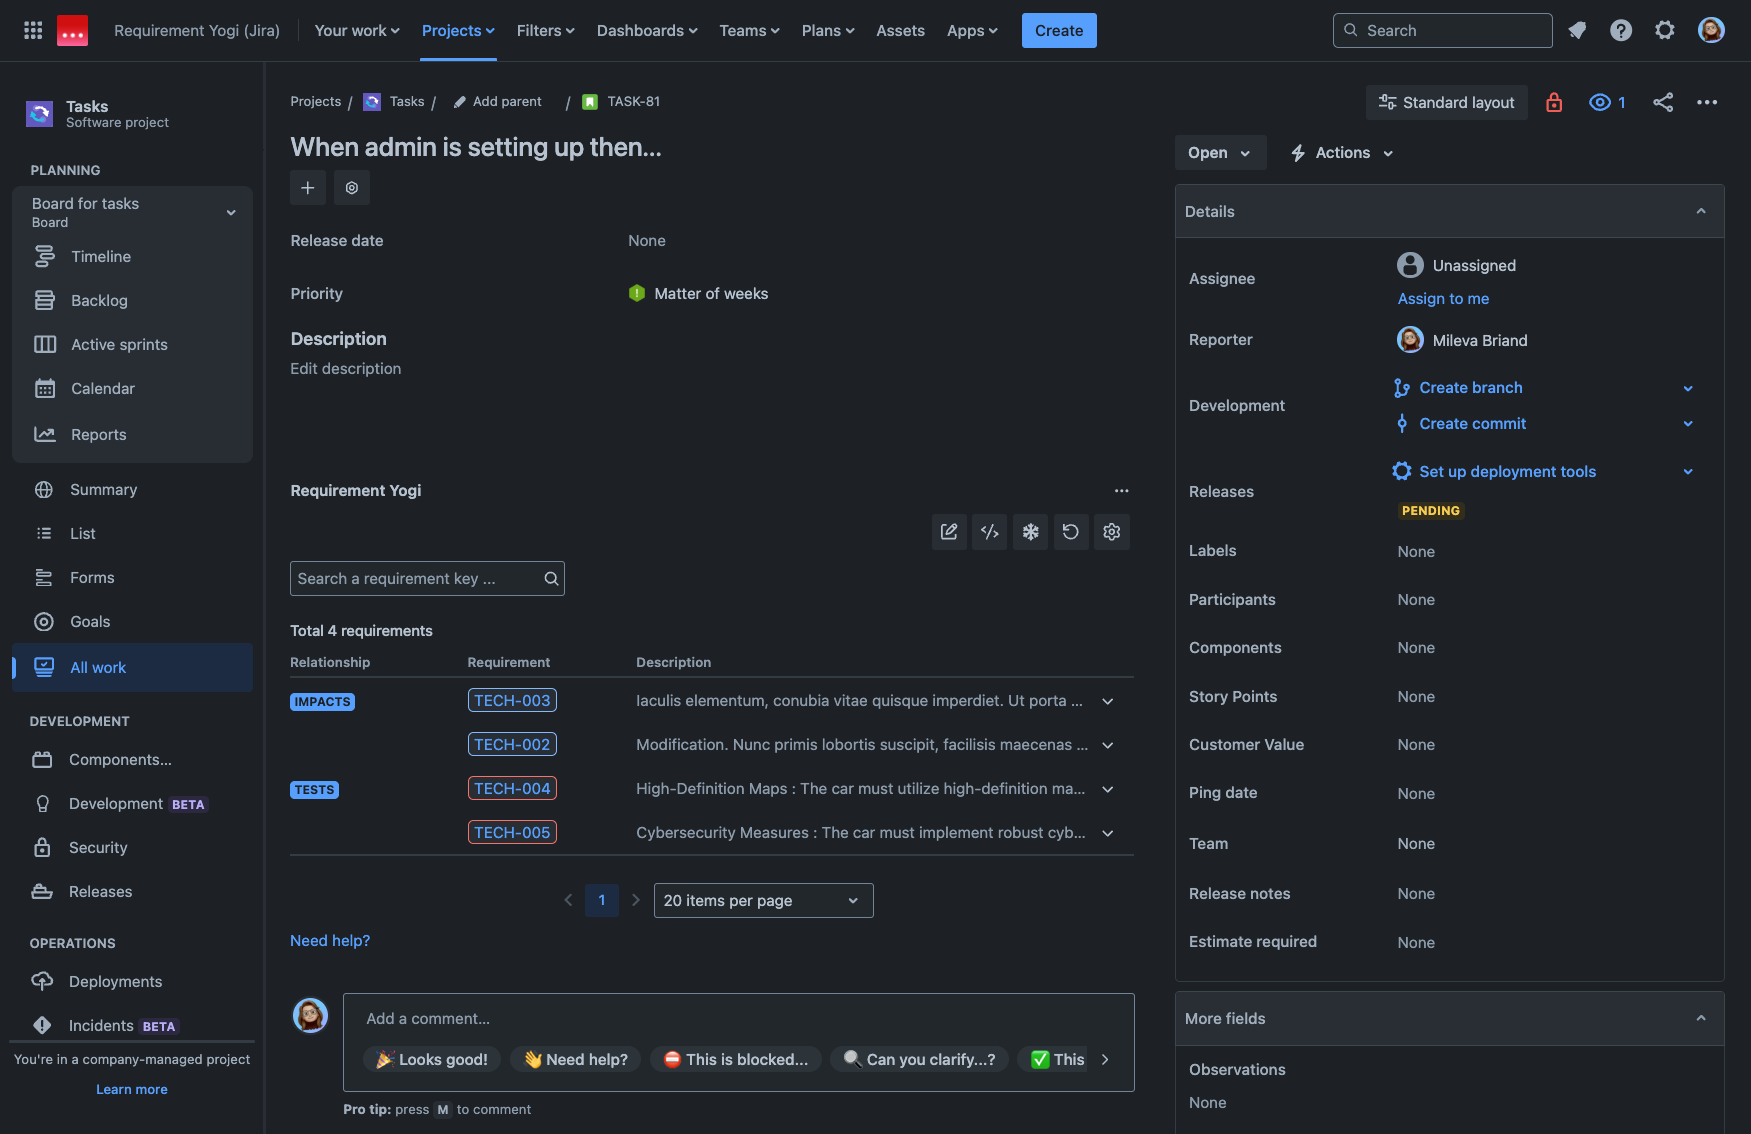
Link requirements to Jira issues
Imagine you have already existing Jira issues, and already existing specifications with Requirement Yogi. With the integration, you are able to link requirements to issues directly in Jira.
To add a requirement link, use the same shortcut as before, or click on More and Requirement Yogi links. The blueprint will appear and you can use the criteria and search query to find the requirements you want to link.
Jira bulk issue creation (on Data Center)
Imagine you are a product owner, the day before the sprint meeting, you need to create all those Jira issues and link them to other issues, requirements and so on. Well, you can bulk create issues from your requirements with our bulk issue creation feature.
It all starts from the search tab. Select multiple requirements and click on Action, and Create Jira Issue. In this new tab, you’ll first need to create an issue template with the Jira instance, project, relationship and issue type. Once you’ve chosen those, you will be able to pre-fill the Jira fields with specific details. Imagine you want to bulk create issues that will have the same content of their requirement. You can add variables in the fields to automatically add the key, text or property of the requirement. For example, in the summary field, I want the name of this new story to be the name of the requirement, I will enter {key}.
When you are done with the template creation, select the requirements from the left sidebar and drag and drop them on the template. Here, you will have the ability to fill out more fields if needed. As you can see there is a box here to group all links into one issue. We recommend you to tick this box to create stories regrouping various requirements, however the variables will not work in this case. On the other hand, we do not recommend creating one issue per requirement, as it implies you are managing the same data as requirements and as Jira issue. You will then have trouble keeping them up to date with Confluence. This is why we don’t support scenarios like linking one Jira issue to a thousand requirements or the opposite.
Once you’ve checked everything, click on Create and you will see on the right sidebar the progress of the creation until all the issues are done. When the issues are created, all the links are active, meaning you can click on them to navigate directly into your Jira project. If you want to update those Jira issues, let’s say because the requirement has changed, you can also drag and drop the issue from the right sidebar into the template to update it. But you can also update the fields yourself directly in Jira.
Whether you link your requirements from Jira or from Confluence, the Jira links will always be visible in the requirement pop-up.
Write, Track, and Manage requirements in Confluence
In conclusion, Atlassian Confluence allows you to write and create your requirements from scratch to have clear and permanent specifications. We’ve shown you how Requirement Yogi allows you to go further into your requirement management with the ability to navigate between dependencies and links, search through requirements based on search syntax, and track the status of your project with the Traceability Matrix. The app can do more than that with baselines, Excel imports and exports, and even its own testing solution.
Jira allows you to build a solid project management strategy and efficient tracking of tasks. The integration of requirements with Jira is a must need. Requirement Yogi for Jira allows you to gather the strength from both Confluence and Jira to greatly enhance the process of your development, allowing your team to have a clear and comprehensive understanding of the requirements to deliver high-quality software on time and within budget.


5 replies on “How to manage requirements in Atlassian Confluence and Jira?”
[…] product managers attempt to manage requirements directly in Jira rather than in Confluence. It seems like a natural solution since that’s where […]
[…] Requirement Management 101 […]
[…] Requirement Management 101 […]
[…] Requirement Management 101 […]
[…] Requirement Management 101 […]
Comments are closed.